This article is about embedding custom maps made with Google maps into blogs made with Blogger. However similar principles also apply to putting Google custom maps into other types of website.
Overview:
Previously I've described how to make a custom-map in Google Maps.
Not only does this add a visual dimension to your blog, it can also be an excellent way of showing your progress on a journey, or describing your neighbourhood or the area that you blog about.
That said, you should also use the Location tags in posts, so that the posts themselves as well as the map shows your status.
If you are using Google custom maps, then once you have created a map, you can:
How to to link or embed a Google custom map:
Log in to Google maps using the Google account that you used to create the map.
Make a new map, or click "My Places" to see the list of maps you have made.
Select the map you want to link to.
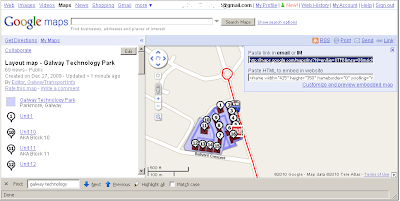
Click the "Link" item: it's at the top of the left-hand sidebar, beside the print icon.
A new panel opens just underneath the Link button.:
If you want to share the map by email, or by linking to it on a website, then copy the code from the top entry in the panel, which is labelled "Paste link in email or IM".
 However if you want to put the map itself into your blog, then DON'T just copy the code from the item labelled "Paste HTML to embed in website".
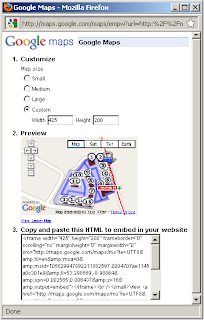
Instead, click Customize and preview embedded map.
This opens the map in a new window, where you can preview the actual zoom-level that will be used, and also pick a standard map size of a custom one.
Choose the settings that you want - including scrolling up and down slightly, so that the correct area is shown.
Copy the HTML from the window at bottom of the screen. (Make sure you select ALL the code that's in the box: on many systems with happens if you put the cursor in the box and press Ctrl/A)
Put the copied HTML into your blog - you have several options for doing this.
Overview:
Previously I've described how to make a custom-map in Google Maps.
Not only does this add a visual dimension to your blog, it can also be an excellent way of showing your progress on a journey, or describing your neighbourhood or the area that you blog about.
That said, you should also use the Location tags in posts, so that the posts themselves as well as the map shows your status.
If you are using Google custom maps, then once you have created a map, you can:
- Email a link to the map to other people: when they click on the link, their web-browser opens Google Maps, and shows them them map
- Put a link to the map on a website: when a viewer click on the link, their web-browser opens Google Maps and show them them map
- Embed the map into a website: when the web-page loads, the map (including zoom-tools, scrolling, etc) is displayed.
Log in to Google maps using the Google account that you used to create the map.
Make a new map, or click "My Places" to see the list of maps you have made.
Select the map you want to link to.
Click the "Link" item: it's at the top of the left-hand sidebar, beside the print icon.
A new panel opens just underneath the Link button.:
If you want to share the map by email, or by linking to it on a website, then copy the code from the top entry in the panel, which is labelled "Paste link in email or IM".
 However if you want to put the map itself into your blog, then DON'T just copy the code from the item labelled "Paste HTML to embed in website".
Instead, click Customize and preview embedded map.
This opens the map in a new window, where you can preview the actual zoom-level that will be used, and also pick a standard map size of a custom one.
Choose the settings that you want - including scrolling up and down slightly, so that the correct area is shown.
Copy the HTML from the window at bottom of the screen. (Make sure you select ALL the code that's in the box: on many systems with happens if you put the cursor in the box and press Ctrl/A)


0 comments:
Post a Comment